Data Logger Import
The data logger import dialog is a tool to import data from various sources such as burst, device, flashcards or USB-sticks.
Launching Data Logger Import Tool
The data logger import tool can be launched in two ways:
- WinDarab via the Orb
- If "Read data logging from logging device" is selected for the Quick Access Toolbar:
The Data Logger Import Tool can be launched by clicking the offload icon. - Click Orb → Read data logging from logging device. Then select the Data Logger import radio button and click Ok.

- Standalone Executable
The Data Logger Import Tool can also be launched by opening the executable DataLoggerImport.exe found in WinDarab's install directory. Data Logger Import is a stand-alone tool.
Using Data Logger Import Tool
The tool contains of three tabs to control the settings and the status of the importing.
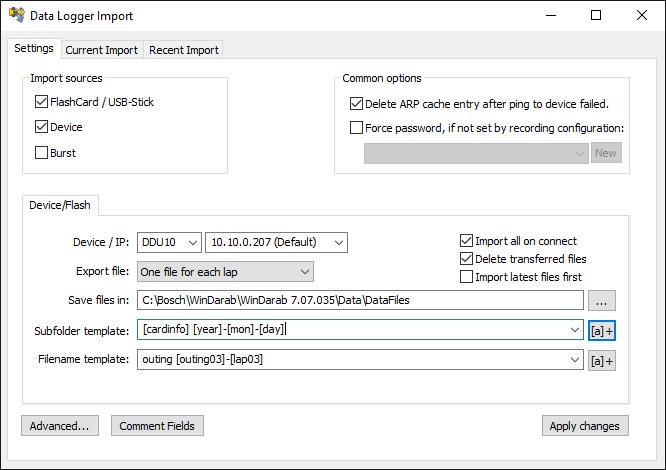
Settings Tab
The settings tab helps you customize the import-procedure.
Import Source Settings
Select the sources that you want to monitor. Available are:
- FlashCard/USB-Stick
- Device
- Burst
If the FlashCard/USB-Stick checkbox is checked, an inserted flashcard or USB-Stick will be recognized when connected and shown in the current import-tab.
Device and Burst enables the monitoring of the IP-Addresses, that are chosen in the burst or device-settings visible in the lower half of the dialog.
Note: Device and Burst can’t be selected at the same time. If you enable one of them while the other one is enabled, the other one will be disabled.
The settings for each source are on the bottom half of the dialog.
Note: The individual settings are only shown when the corresponding import sources are enabled. For the Device/Flash settings to be shown, at least one of these sources must be enabled. Accordingly, burst must be enabled to show its settings.
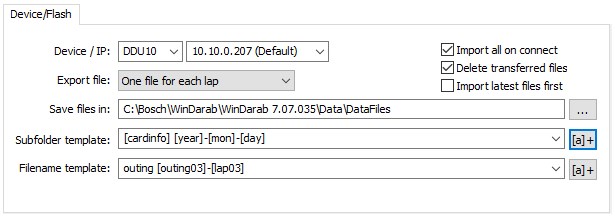
Device/IP | In the Device/IP-field, you can chose from a set of pre-defined IP-addresses or insert your own IP-address. |
Export file | The export file-selection defines which fragments should be combined to one single file. |
Save files in | This field specifies the base folder, where the measurment files are stored. |
Subfolder template | Specify a naming for the subfolders that can be created when files are being imported. This field also contains a dropdown menu with the 5 most recently used templates. |
Filename template | Specify the filename that is given to the imported file(s). This field also contains a dropdown menu with the 5 most recently used templates. There are a lot of placeholders for the template which can be inserted manually or chosen by the template-button right to the combo-box. |
The following wildcards may be used in Subfolder and Filename templates:
- [year] Year*
- [mon] Month*
- [day] Day*
- [hour] Hour*
- [min] Sec*
- [cardinfo] CardInfo entry (configuralble through RaceCon Recording name)
- [lap] Number of the first lap
- [outing] Number of the outing (of the first lap)
- [fragment] Number of the file fragment
- [n] Consecutive numbering (allowed in file names only), this is always recommended to be used. In the event naming collisions occur files will have a consecutive number appended to the name.
- [fastlap] Fastest lap (allowed in file names only)
- [fastouting] Outing containing the fastest lap (allowed in file names only)
- [fastlaptime] Laptime of the fastest lap (allowed in file names only)
- [RecDateYear] Year of the recording (Make sure the clock time on the logger is set)
- [RecDateMon] Month of the recording
- [RecDateDay] Day of the recording
- [RecStart] Time the recording was started.
- [RecEnd] Time the recording ended.
Note: If you use a finer template than the merge-option, it will be replaced by ‘-1’. So, if for example all fragments of an outing are merged and you are using the [lap] template, it will be replaced by ‘-1’, even if there is only one lap in the outing.
- Note: You can also specify a format for the following templates: [outing], [lap], [fragment], [fastlap] and [fastouting]. Add a number between the template name and the closing bracket to specify the shown digits. For example: if [fastouting] results in 12, [fastouting03] results in 012.
Import all on connect
This option must be checked in order to import all new files directly - once a source is found. For example, the flashcard-data is imported right after the card has been inserted into the computer. If this option is not enabled, you must manually import the files in the current import tab. Additionally you can choose exactly the fragments you want to import.
Delete transferred files
With this option enabled, the source files on the device are deleted after they have been successfully imported.
Common Options
Here, the password for the resulting files can be set. You can select a previously set password or create a new password with a click on the “New”-Button. If the “Force password…” option is disabled, no password is set.
Note: A password defined in Racecon will supercede the password settings here.
The “Delete ARP cache…” option deletes the ARP-entry for the host-IP if a ping failed. Use this option if you can’t reach the host even if you know it is reachable. We recommend activating this feature.
Note: The settings that you change need to be committed before they are applied to the import. Do this by clicking the __ “Apply changes”__-button.
Advanced Settings
Further settings can be found by clicking on the “Advanced…”-button.
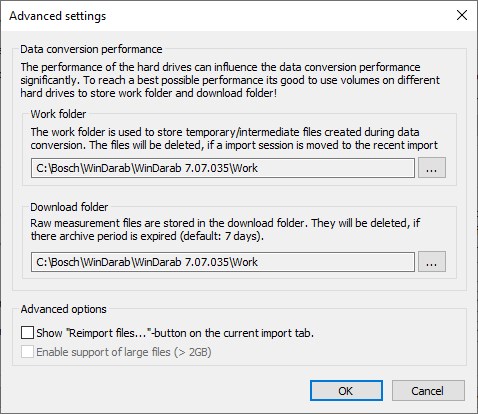
In the advanced settings, you can configure paths for your downloads and your work-path. For more information about the import-process see Import Process.
You can also change the visibility of the “Reimport files…”-button. For more information about the “Reimport files…”-button see Current Import-Tab.
Comment Fields
You can view and edit the default values of the comment fields by clicking on the “Comment Fields” – button.
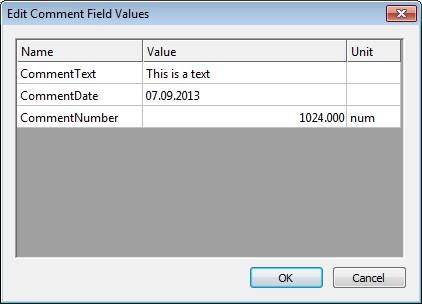
In the Comment Fields dialog, you see all user defined Comment fields with their name, the unit and the default value. You can edit the default value in this dialog by selecting the value cell of the comment field.
Important: Comment Fields are the precursor to Setupsheets. While these are still supported, they are not recommended.
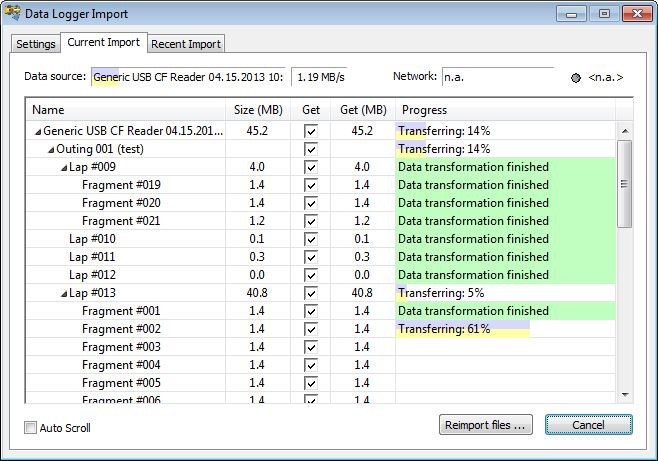
Current Import Tab
The current import-tab shows you the import-state of your currently active data-source.
Data Source
Without an import-run, the source-field shows information about possible actions you could do like inserting a flashcard or status-information like searching for a burst-device.
If an import is active or a source is found, the “Data source-field” shows the connected data-source. Also, it indicates the status of the import with colored bars.
The field right to the data source field shows the download-speed. This is only shown when you are in the download-phase of an import.
Network
The network shows what measurment media you are connected to. In addition, you see the latency to this host.
The main part of this page shows the import status.
At the beginning of the import run, it is possible to select or deselect any fragment you want or don’t want to import in the “Get”-column. This requires the “Import all on connect”-option to be disabled in the settings-tab.
Note: Initially the check marks are set for the files that have never been imported from this source. So, if a fragment is imported but not deleted once, it will not be checked initially (and thus it won’t be imported when the “import on connect” option is enabled.
With a click on Import, the import-process is started. Now you see the status of each fragment, lap, outing and so on as the import-process progresses.
First the data is downloaded from the device and then converted into a temporary file. After the conversion, the files are merged as selected in the settings-tab. If the import was successful, the items are marked with a green background.
You can cancel the importing by clicking on “Cancel” while the importer is running.
The dialog automatically selects the current active fragment. You can disable this feature by using the scrollbar or disable the auto-scroll-option at the bottom of the page.
When the import is finished, the Progress-column shows the success of the import-process.
Reimport files...
You can import already downloaded raw measurement files by clicking on “Reimport files…” and selecting the files from the work-folder. This is especially useful when you must import raw data again but don’t have access to the source device.
Note: If there is no “Reimport files…”-button on the Current import-Tab you must make it visible by selecting the option in the Advanced settings.
Recent Import Tab
The recent import-tab shows the recent imports and their success.

In this tab you find all previous import runs and their success-status. As you can see in the screenshot above, all import-runs have their own root-entry that can be expanded like in the current import tab.
An import run is automatically added when the source is removed, and the import is finished.
The status of every imported fragment is displayed in the success-column. Here you see which fragments were imported correctly, and which were not imported, which files have been created and which downloads have failed.
Troubleshooting Data Importing and Tips
Import Process
The Importing of a file runs in four steps that can run partial parallel.
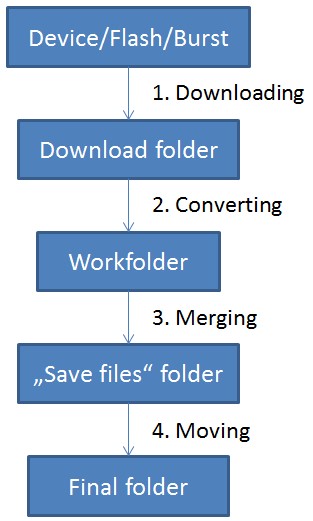
- The file is downloaded from the device. In this step, the data is copied from the device to your local hard drive. You can specify this folder under Settings→Advanced→Download folder.
- The downloaded file is then converted into a temporary file. This step doesn’t need the file to be downloaded completely. As soon as there is data downloaded to your hard drive it is converted. As the download folder, the work folder can also be specified in advanced settings.
- When all parts for the final merging (according to the “export file”-option in the settings-page) are converted, they are merged into a single file that can be used in WinDarab. While the merging is in progress, a temporary file is written into the “save files”-folder specified in the device settings.
- When the file is merged completely, it is moved to its final folder (“save files”-folder combined with the specified subfolder) and renamed according to the template as defined in the device-settings.
After the files have been merged successfully, the temporary files are deleted.
Tips
- Setting File Paths: As you can see, you have many options to control the importing by setting the paths. And there is also much performance increase that can be gained by setting the paths wisely.
In almost every step, files are read and written to your hard drive(s). So, if you want a fast download and have more than one hard drive installed into your pc, it is advised to select your download folder to be on another physical hard drive than your other folders. This way the download can use the full transfer rate of the hard drive.
- File Sizes: Have an eye on the file-sizes. The files on your device are compressed.
As the data-import is optimized mainly towards speed, the imported files are uncompressed and can be significantly larger than the original data. Additionally, there are the downloaded, converted, and merged files saved on your hard drives during the import process, so make sure you have enough free space to support it.
Common Issues
- Data logging import issues launching due to WinDarab crashing or license issues: Launch standalone DataLoggerImport.exe.
- Cannot get connection to device: Check wiring, physical connection, device power, and firewall settings. Create a firewall exception for Data Logger Import tool and WinDarab.
- Download not completing: Check firewall settings. Do not plug another USB device in while the download is ongoing.