Setupsheets
In WinDarab vehicle setupsheets can be created and maintained to correlate data with car changes. Setupsheet values can be used in data analysis for viewing and calculations.
What are setupsheets?
If a file is opened, WinDarab looks for the file “Setupsheet.xml” starting in the folder of the file and all folders up to the root. If a setupsheet is found, the setupsheet is applied to the file.
A setupsheet contains sections with CAR elements. A CAR element contains a file name pattern attribute which is used by WinDarab to determine which CAR element is used for a certain file.
A CAR element contains CHANNEL elements which are used to define virtual channels.
Each CHANNEL element contains one or more OUTING elements, which define the channels value for the given outing.
WinDarab is now creating/updating a virtual channel and puts the found outing value into this channel (at least at each beginning of a lap or file).
Folder Layout Options
Example Folder Layout:
C:
└── Data
└── 20190325 - Sebring
├── Chassis 1
│ ├── Setupsheet.xml
│ ├── Chassis 1 Outing 1.bmsbin
│ └── Chassis 1 Outing 2.bmsbin
└── Chassis 2
├── Setupsheet.xml
├── Chassis 2 Outing 1.bmsbin
└── Chassis 2 Outing 2.bmsbin
Alternate Folder Layout:
C:
└── Data
└── 20190325 - Sebring
└── Setupsheet.xml
├── Chassis 1 Outing 1.bmsbin
├── Chassis 1 Outing 2.bmsbin
├── Chassis 2 Outing 1.bmsbin
└── Chassis 2 Outing 2.bmsbin
Setupsheet Creation
There are two main ways to create setupsheets.
- Manually via the WinDarab Gui
- Programmatically from an existing Excel sheet or other source (XML File).
Manual Creation
To create a setupsheet:
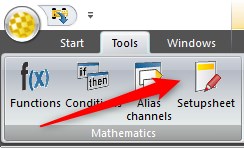
- Click on the Setupsheet icon in the ribbon under Tools → Mathematics
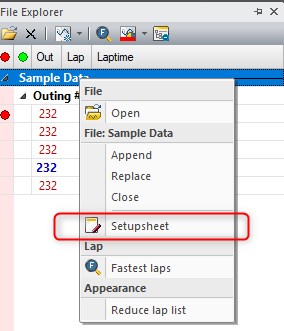
- Right Click on the <filename> in the File Explorer
Or
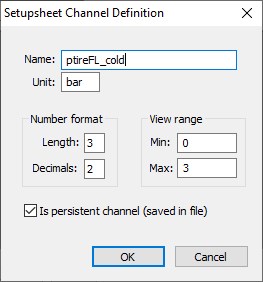
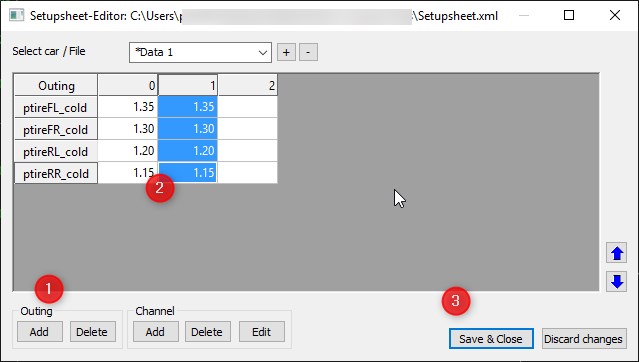
This will open the setupsheet creation and editing interface. Rename your setupsheet as desired; then click to add channels.
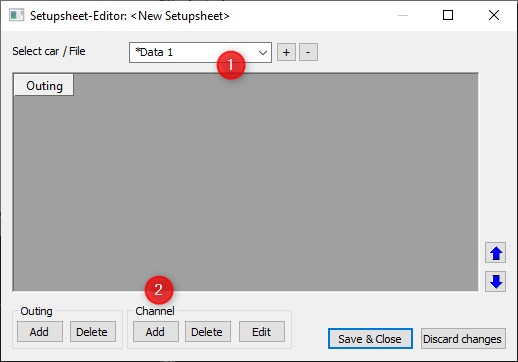
Add and configure properties for all channels to be used. Channels can be added or edited later from the same window.
To finish inserting initial values add an outing, add setupsheet values, and Save & Close.
Programmatic Creation
Notes
- The hierarchical order of CHANNEL and OUTING elements can be switched.
- Currently there’s no UI to edit the “Setupsheet.xml” this will come.
- If a persistent virtual channel is defined by the setup sheet, WinDarab checks and (if necessary) updates the saved channel data.
- Changes to the setupsheet.xml are automatically detected and used to update the virtual channels immediately!
The following attributes are supported:
Attribute | Property | Description |
CAR | Filename | Filename pattern (with wildcards “*” or “?”) to select the node for a file. |
CHANNEL | Name | Name of the (virtual) channel |
| Unit | Unit of the (virtual) channel) |
| Format | Number format (Len.Dec), The numbers are 10-based. |
| Min | Default y-axis view minimum |
| Max | Default y-axis view maximum |
| Persistent | If True, the virtual channel is saved to the file. |
Note:
- To match all files, use the Filename pattern: '*'
Example XML Format
<!-- One way -->
<SETUPSHEET>
<CAR Filename="Chassis 3*">
<CHANNEL Name="packer_fl" Unit="mm" Format="5.2" Min="18" Max="20" Persistent="True">
<OUTING Value="108">18.5</OUTING>
<OUTING Value="109">19.3</OUTING>
<OUTING Value="106">19.2</OUTING>
</CHANNEL>
<CHANNEL Name="packer_fr" Unit="mm" Format="5.2" Persistent="True">
<OUTING Value="107">18.5</OUTING>
<OUTING Value="108">19.5</OUTING>
</CHANNEL>
<CHANNEL Name="packer_rl" Unit="mm" Format="5.1" Persistent="True">
<OUTING Value="108">19.5</OUTING>
<OUTING Value="109">19.2</OUTING>
</CHANNEL>
<CHANNEL Name="packer_rr" Unit="mm" Format="6.3" Persistent="True">
<OUTING Value="107">18.5</OUTING>
<OUTING Value="108">19.5</OUTING>
<OUTING Value="109">19.2</OUTING>
</CHANNEL>
</CAR>
</SETUPSHEET>
<!-- Other way -->
<SETUPSHEET>
<CAR Filename="Chassis 3*">
<OUTING Value="107" >
<CHANNEL Name="packer_fl2" Unit="mm" Persistent="True">18.5</CHANNEL>
<CHANNEL Name="packer_fr2" Unit="mm" Persistent="True">18.5</CHANNEL>
<CHANNEL Name="packer_rl2" Unit="mm" Persistent="True">18.5</CHANNEL>
<CHANNEL Name="packer_rr2" Unit="mm" Persistent="True">18.5</CHANNEL>
</OUTING>
<OUTING Value="108" Persistent="True">
<CHANNEL Name="packer_fl2">18.0</CHANNEL>
<CHANNEL Name="packer_fr2">18.0</CHANNEL>
</OUTING>
<CAR>
</SETUPSHEET>
Using Setupsheet Channels for Data Analysis
For the Setupsheet values to be used in data analysis two conditions must be met:
- The setupsheet CAR attribute Filename must match the BMSBIN file name. Wildcards can be inserted with asterisks (*). Screenshots in the Manual Creation section show the Filename as "*Data 1", this allows files whose name ends with "Data 1" to match with the setupsheet
- The setupsheet file must contain the outing number to match the dataset outing number. Outing numbers can be manually edited in the Setupsheet GUI by clicking on an outing number. An outing number value of '0' can be used as a 'global' or 'default' value for the setupsheet
Using Values in Plots and Math
Setupsheet channels shown as "Virtual Channels", persistence can be set with the channel properties. These Virtual Channels can be used the same as all other virtual channels in functions, conditions, and plots.
Changing existing Setupsheets
Setupsheets can be updated by opening the Setupsheet GUI and clicking on values to be changed. Channels and outings can be edited, added, or deleted at any time.
Example: Setupsheet & Telemetry
As of WinDarab 7.7.003, Setupsheets can be used with Telemetry.
Prerequisites:
- Setupsheet file must exist in the %WinDarab Install Directory% / Config / WDServer directory.
- The easiest way to do this is to use File Explorer → Setupsheet

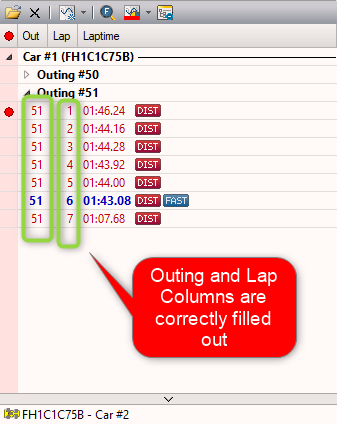
- WinDarab needs to know what Outing and Lap Special Channels your telemetry stream is using.
- These are probably laptrigger_outcnt_dls and laptrigger_lapcurr_dls
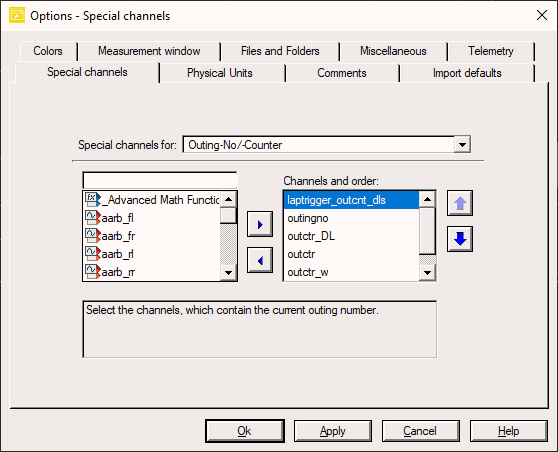
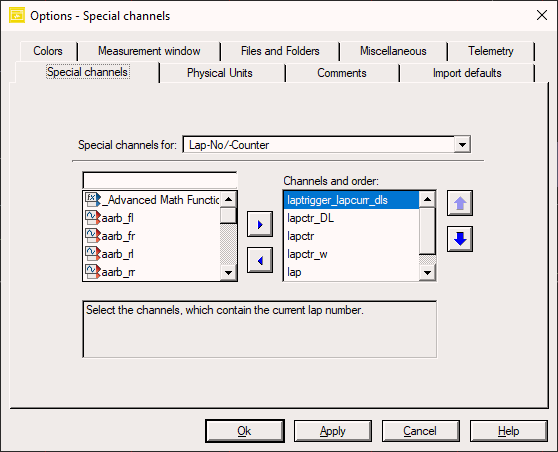
Verify your special channels settings are correct with your telemetry stream connected if your File Explorer looks similar to this: